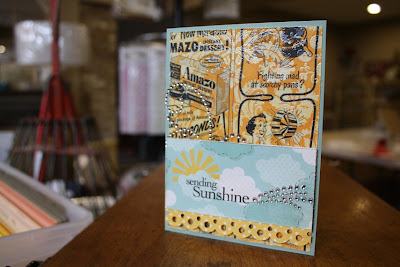
I still have some space left in the card class for tomorrow night. E-mail upthestreet@isp.ca to reserve you spot now :)
Tuesday, March 1st, 2011 ... Card Class
6:30 pm ... taught by Tara
Learn some new techniques while creating five beautiful all occasion cards.
We will be using Ranger Distress inks in several different ways, embossing folders for custom letter-pressed tag accents, sticky-back canvas, vellum, etc.
$20.00 class fee includes a 10% discount on any scrapbooking items purchased that evening.
Class participants must bring good quality two-sided tape and scissors.
Monday, February 28, 2011
Monday, February 21, 2011
Colour Challenge
This week's challenge is brought to us by Lesley. Simply use the colours below as the basis for a layout or card. Upload your finished project to the Flickr Gallery and be sure to mark it "FebruaryContest" by midnight EST February 28th for your chance at the February prize of a $30.00 credit to the Up The Street store. For links to the other challenges this month, visit the website.
Tuesday, February 15, 2011
Vintage Bits
My favorite television shows as of late seem to be American Pickers and Auction Kings. There is something so interesting about an item that has existed for decades ... moving from owner to owner. Sometimes its history is known and documented, but more often, it is left to the imagination as to the life it has lived.
I am so fortunate that I was introduced to a wonderful couple, Bob & Mary, who travel around in their retirement, searching for treasures. So many of the items they bring to the store would look beautiful in a dedicated scrap space.
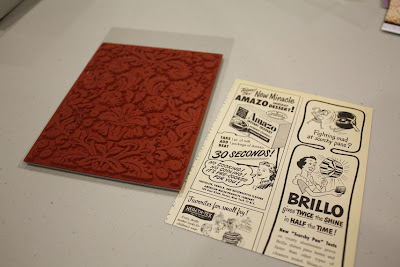
To keep the kids occupied, a beautiful old abacus. How many little fingers do you suppose have counted on this? For holding your Tim Holtz Blending Tools, a vintage stamp holder with 3 vintage stamps ...
Monday, February 14, 2011
Emboss Resist Tutorial by Lesley and this week's challenge
In each side of the February kits, is a sheet of the Pink Paislee House of 3 resist paper. Lesley whipped up the following tutorial to demonstrate the numerous ways you can customize this paper for your projects.
If you don't have any of this fabulous paper handy, but still want to use the techniques Lesley has shown, try making your own resist paper.
Grab a background stamp, clear embossing ink and clear embossing powder. Stamp and heat emboss your image on a lightish coloured background paper (the lighter the paper, the more you'll be able to play with your technique).
From here, you can use any of the techniques Lesley shared in her video. I used Studio Calico Mister Huey's in Sunshine.Grab a background stamp, clear embossing ink and clear embossing powder. Stamp and heat emboss your image on a lightish coloured background paper (the lighter the paper, the more you'll be able to play with your technique).
You can see the ink beading up on the stamped image.
Give it a good wipe with a paper towel. This also helps to rub the excess ink into the paper to further enhance your stamped image.
And the finished card ...
Had I used a Glimmer Mist, the whole surface would have a bit of a sheen, but by using the Mister Huey's, there is more definition between the stamped image and the background paper.
So this week's challenge is as follows ...
Use a resist paper (or create your own) in a layout.
Be sure to have your layout uploaded to the Flickr group (tag with "FebruaryContest") by midnight EST February 28th to be entered into this month's drawing.
Wednesday, February 9, 2011
Die-cut paper Challenge
This week's challenge was kind of a challenge for myself. I have an awful habit of saving (some might say hoarding) my die-cut papers. I don't know why ... I just do.
So real simple ... just use a die-cut paper on your layout.
To give you a few ideas, have a look at what we've done with February's "Let The Sun Shine" kit ...
I chose to flip my We R Memory Keepers Be My Valentine "Sweet Nothings" die-cut paper over and give it a few sprays of Studio Calico Mister Huey's in Sunshine.
Heather split hers and repositioned it to create an entirely different shape.
Lesley left her paper intact, but highlighted the die-cut hearts on the corners with stickles.
The other die-cut paper in the "Let The Sun Shine" kit is the KI Memories Sew Cute Daisy paper. Again, there are many ways you could use this paper, but both Heather & Lesley chose to leave it as is for their base. It just looks like a big ol' happy flower :)
They both even used the same colour cardstock for their background and used many of the same embellishments to dress up the page. As you can see, the colours work equally well for both girl and boy layouts.
Be sure to have your layout uploaded to the Flickr group (tag with "FebruaryContest") by midnight EST February 28th to be entered into this month's drawing.
Labels:
contest,
February Kit,
Heather Derbecker,
Lesley Langdon
Thursday, February 3, 2011
Path Finder
Just a share today of one of Lesley's layouts done with the "My Shabby Valentine" kit.
Soooo pretty. Sigh. I'll share a little secret ... I'm a sucker for brown glitter. Don't know why, don't know how. I just love it. So of course, I love this layout. It's really difficult to tell from the photos, but the text banners are the top and bottom of the patterned paper comes with the outlining of brown glitter.
One of the ways that Lesley adds a lot of interest to a layout without being overwhelming is by using die cuts. I know that she does a lot with her Silhouette, but I think that the ones used here are Spellbinders. Very subtle but very effective. Lesley used the brown glitter trim to frame her centre grouping. I never would have thought of piecing it together that way. Maybe it came to her in a dream :)I've slowly been adding more products back into the store. At one point, I took everything out but the kits, but in an effort to provide a more complete online shopping experience, you will now be able to purchase some of your favorite scrapbook tools and products from Up The Street. Keep checking back as more stock is added daily.
Wednesday, February 2, 2011
A Sketch and a Contest
We've got a few new things in store for you this month.
The first is a new contest.
Each week, a new challenge will be posted and you will have until the end of the month to post your entry to the Flickr Gallery (please tag with "FebruaryContest". You don't need to complete all of them ... just the one(s) that you can get to.
All entries will be entered into a random drawing March 1st for a $30 credit to the store. Use an Up The Street kit for your challenge layout to double your changces to win.
Challenges will be posted Mondays.
The first challenge is a sketch ... coming your way courtesy of Heather ...
And her example using the "Let The Sun Shine" kit ...Have fun!
Tuesday, February 1, 2011
February Kits
It's that time again ... Reveal Day! And this month we've got a lot to show you.
We've changed our kit format a bit. Rather than the large kit we've been doing in the past, this month offers two seperate kits. Each is a full kit on it's own, but can be mixed with the other to create that larger size kit that many enjoy. Each side runs $31.50, but if you purchase both, you'll receive a $5.00 discount.
The first side is "Let The Sun Shine" ...
Fresh, bright colours to help snap you out of your winter doldrums. Patterned papers are from My Mind's Eye, October Afternoon, Studio Calico, with one of the new resist papers from Pink Paislee via House of 3. It was the first sheet I played with and am wishing I'd ordered more.
Coordinating buttons from My Mind's Eye, tickets from Pink Paislee, sticker elements from Basic Grey Curio and sparkly Thickers in that gorgeous turquoise ...
Die-cut papers from We R Memory Keepers and KI Memories with a few fun bits from Tim Holtz ...
The second side is "My Shabby Valentine". I'm generally not one to go for a themey type of kit, but still wanted to provide some products that could be used for soft, shabby layouts and cards for the Valentine season ...
We went with gorgeous papers from Basic Grey Curio, another sheet from the Pink Paislee House of 3 and some glittery My Mind's Eye. Muted browns, pinks and greens are the predominent colours here with lots of sparkle in the form of Making Memories trim, Ranger Rock Candy Distress Stickles, Prima flowers, Kaisercraft rhinestones and a brown glittered alpha.
Glitz Paper Layers and Whatnots ...
And a few Maya Road crystal trinket pins complete this lovely shabby collection ...
Lesley was good enough to video herself opening her package this month. So fun. I think you get a better feel for the kit contents when you see her leafing through them as opposed to my flat photos. I'm always so disappointed with the way the kits looked when they're photographed. You miss all of the sparkle and texture that, for me, make the kits.
I'll be adding some extras to the website later on today ... more alphabets and coordinating embellishments.
Lesley was good enough to video herself opening her package this month. So fun. I think you get a better feel for the kit contents when you see her leafing through them as opposed to my flat photos. I'm always so disappointed with the way the kits looked when they're photographed. You miss all of the sparkle and texture that, for me, make the kits.
Heather has had a lot on her plate this past while and chose to use only "Let The Sun Shine" and a few extras for her projects. I had a feeling that she would love this one with the bright, vibrant colours and know that so many of you will be inspired with what she came up with. She used ipod photos and sweet little Ruby's artwork on her pages ... both great ways to try something a little different than you're used to doing.
Lesley uses both sides, but as I predicted, she gravitated towards "My Shabby Valentine". It is so her style. I was blown away with what she's created. That girl is crazy talented. She has also worked up a tutorial that we'll post later on in the month using the House of 3 paper, Shimmerz and inks.
Have a look and if you like what you see, visit the website to order.
I'll be adding some extras to the website later on today ... more alphabets and coordinating embellishments.
Also to come sometime today ... a new contest!
Subscribe to:
Posts (Atom)